
FrameDoctor user guide
Record what happens in your scene, find expensive CPU work and check whether a manual change helps. Start here even if this is your first Unreal Engine project.
- Capture a scene
- Read the evidence
- Make one change
- Compare runs
- Save the result
A frame is one image of your game. Frame time is how long the game takes to produce its next frame. Long frames feel like pauses or stutters. FrameDoctor records a trace, a file containing timing events, and turns those events into a chart and CPU scope list.
- Capture: record a running scene.
- Findings: read frame timings and inspect one piece of CPU work.
- Compare: measure two preserved Development builds before and after a change.
- Runs: revisit recordings and export evidence.
- Settings: save capture profiles and choose thresholds.
The guide is translated; the plugin controls shown here use their English labels. The language selector changes this guide. A short glossary explains unfamiliar Unreal terms.
Install and open FrameDoctor
FrameDoctor supports Unreal Engine 5.5, 5.6, 5.7 and 5.8 on Windows 64-bit. Choose the plugin package matching your engine version.
If you have never opened Unreal
Open Epic Games Launcher → Unreal Engine → Library and launch your installed engine. Open an existing project, or choose Games → Blank → Blueprint, enter a project name and folder, then click Create. A project stores your game; a map, also called a level, stores a scene inside it.
Install from Fab
- Close Unreal Editor. In the launcher's Fab Library, find FrameDoctor and click Install to Engine.
- Select the engine version you use for your project and finish the installation.
- Open your project. Go to Edit → Plugins, search for FrameDoctor, enable it and restart the editor when prompted.
- Open Tools → FrameDoctor in the editor's main menu.
Install a supplied ZIP
- Close the editor and extract the plugin.
- Place its single
FrameDoctorfolder in your project'sPluginsfolder. CreatePluginsif it does not exist. - Check the path below. Avoid an extra nested
FrameDoctor/FrameDoctorfolder. - Open the project, enable the plugin under Edit → Plugins, restart, then open Tools → FrameDoctor.
YourProject/
  YourProject.uproject
  Plugins/
    FrameDoctor/
      FrameDoctor.uplugin
      Content/
      Resources/
      Source/
What if Unreal asks to compile modules?
A compiled package also includes Binaries. A source-only package needs a matching C++ compiler toolchain even if your game uses Blueprints. Install Visual Studio 2022 with Game development with C++ and the Windows SDK required by your engine. In a Blueprint-only project, use Tools → New C++ Class to add a minimal class and create the C++ project target. Close Unreal and build the project's Development Editor / Win64 target in Visual Studio. Then reopen the project. If compilation fails, read the first build error and confirm the engine/package versions match.
Epic's guides: enable and install plugins.
Your first recording
Start with one scene. A scenario tells FrameDoctor when the scene is ready and when measurement can begin. For learning and investigation, use the optional scenario available in the separate example project.
Before step 1: Install FrameDoctor for your engine version; installation to the engine is recommended. Download the optional example project (UE 5.5–5.8, Win64) and extract it. This project contains content only, requires the plugin separately and is associated with UE 5.5. For UE 5.6–5.8, right-click FrameDoctorExample.uproject, choose Switch Unreal Engine version and select your engine first. Open FrameDoctorExample.uproject with that engine and make sure FrameDoctor is enabled.
- Open and save a map. In the example project, open a map or choose File → New Level, save it in the project's
Contentfolder, then use File → Save All. - Start Play. Click the triangular Play button in the editor toolbar. This is Play In Editor, or PIE. Press Shift + F1 to release the mouse so you can use the editor while the game keeps running.
- Choose Capture. Open Tools → FrameDoctor → Capture. Leave Use a packaged Development build unchecked. PIE records the map already running in Play; choosing a different Map field does not switch that world.
- Select the example. In Scenario, search for
BP_ExploratoryScenario. To find its asset, open the Content Browser or Content Drawer with Ctrl + Space and look under Content → FrameDoctorExample → Scenarios (/Game/FrameDoctorExample/Scenarios). The scenario is selected in FrameDoctor; you do not drag it into the level. - Record. Keep a 10-second warmup and 60-second measurement. Read Preflight, then click Capture running PIE. Keep Play running and perform the action you want to investigate. Warmup is excluded from the measured result.
- Read Findings. After capture completes, open Findings if it is not already selected. Read Capture quality and unavailable reasons, then select a CPU scope to see its evidence.
Keep the game running until the recording finishes. Esc or the editor's Stop button can end PIE and interrupt the capture. Use Cancel in FrameDoctor when you want to cancel its current job.
Choose what to record
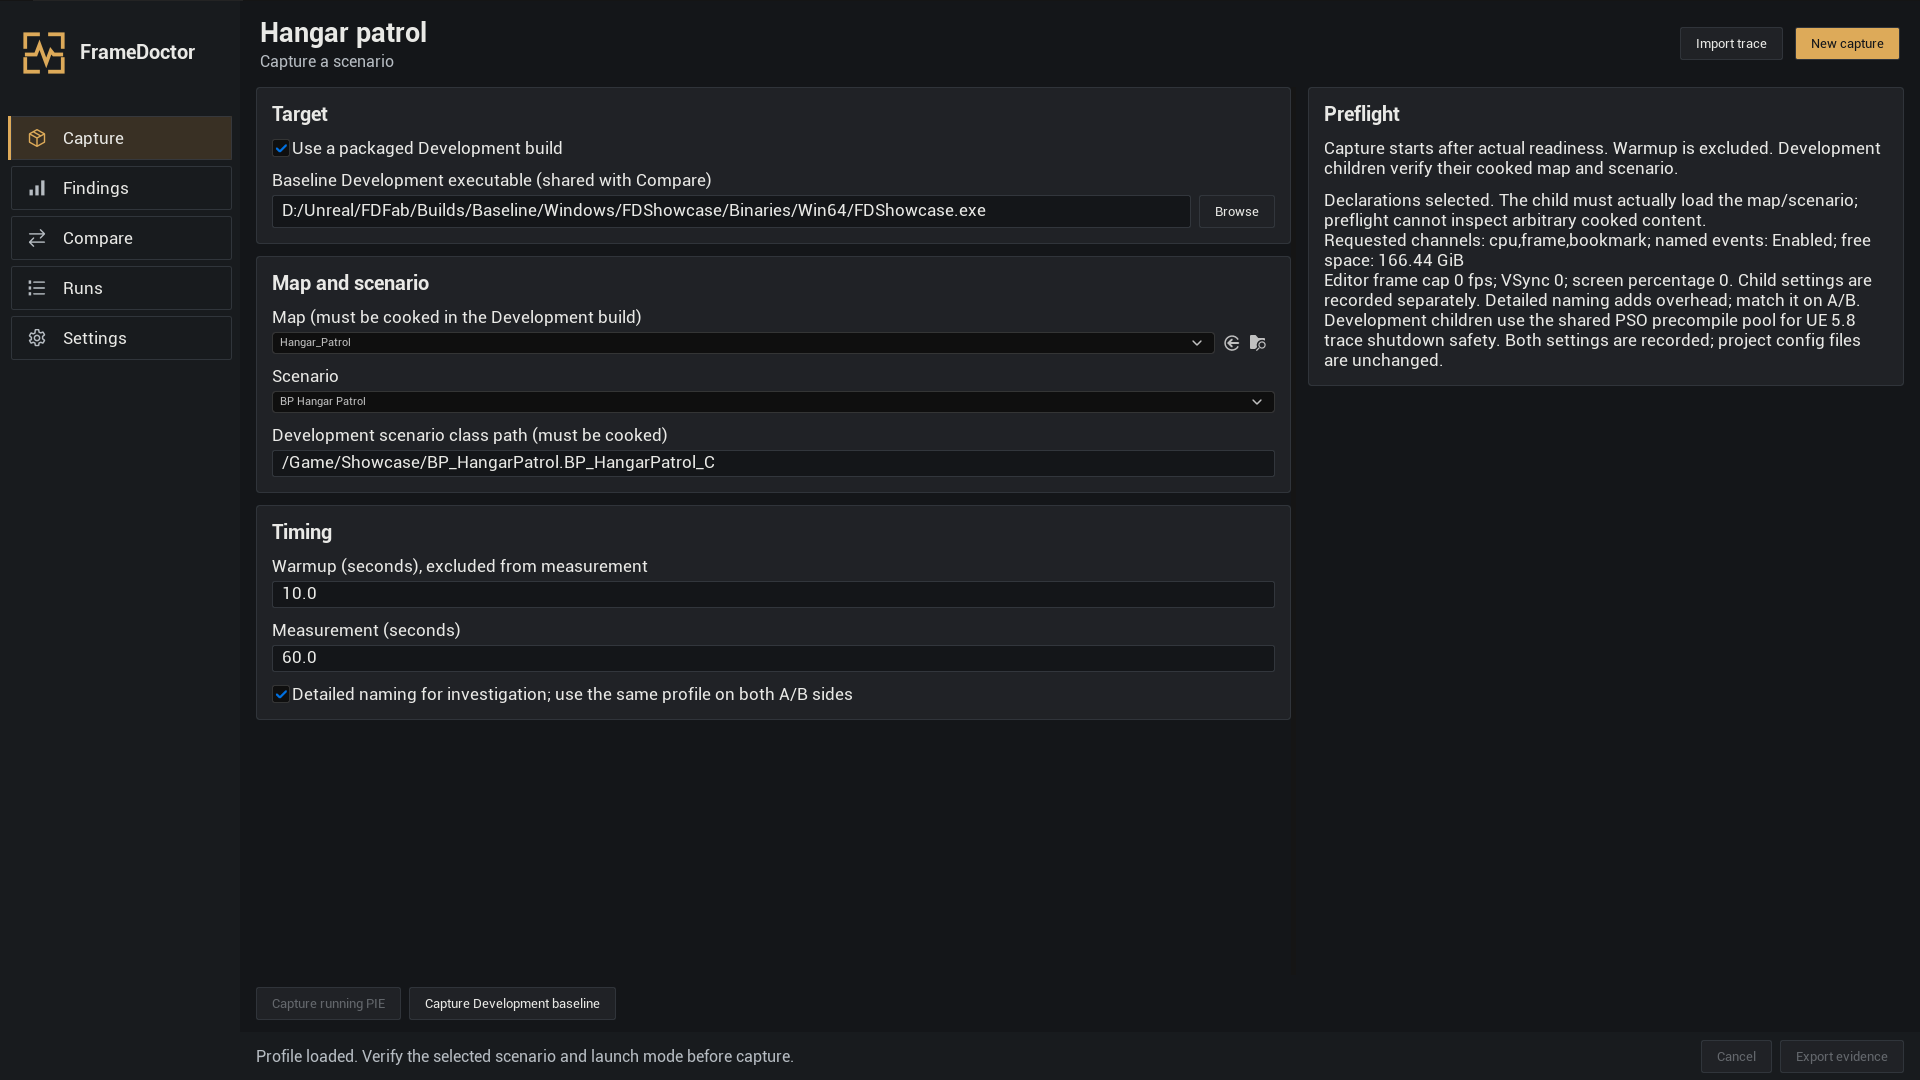
Capture has two targets. With Use a packaged Development build unchecked it records the current PIE world. With it checked, FrameDoctor launches a separate packaged game. Use the packaged route for repeatable before/after measurements.
| Control | How to use it |
|---|---|
| Baseline Development executable | Select the preserved build A with Browse. This path is shared with Compare. |
| Map and Scenario | Select your scenario class. For Development, supply the cooked map and scenario class path. |
| Warmup | Time for the scene to settle after readiness. It is excluded from measurement. |
| Measurement | Time included in the result. Start with 60 seconds. |
| Detailed naming for investigation | Includes more named events. It adds overhead; keep the same setting on both A/B sides. |
| Preflight | Read the selected mode, trace channels and available disk space before starting. |
The normal CPU profile uses cpu,frame,bookmark. CPU events describe work; frame events provide frame boundaries; bookmarks mark the measurement interval. An existing external recording must finish before FrameDoctor starts its own trace.
Readiness comes first, then warmup, then measurement. Ready timeout and Maximum trace size are set in Settings. Cancelled or interrupted recordings are retained with their status; they are not completed comparison baselines.
Read the CPU evidence
Open an existing trace
Click Import trace, choose a finished .utrace file and wait for Findings. Stop the recording before importing it. Keep the adjacent manifest.json and original run files with the trace when you need its comparison provenance. Read Capture quality and unavailable reasons to check the available CPU, frame and measurement data.
Without one unique, complete pair of FrameDoctor measurement-start and measurement-end bookmarks, the whole trace is analysed as an exploratory recording. A missing or unsupported run manifest leaves capture completeness unverified. You can inspect the available events, but cannot use unverified or exploratory data as a confirmed A/B baseline.
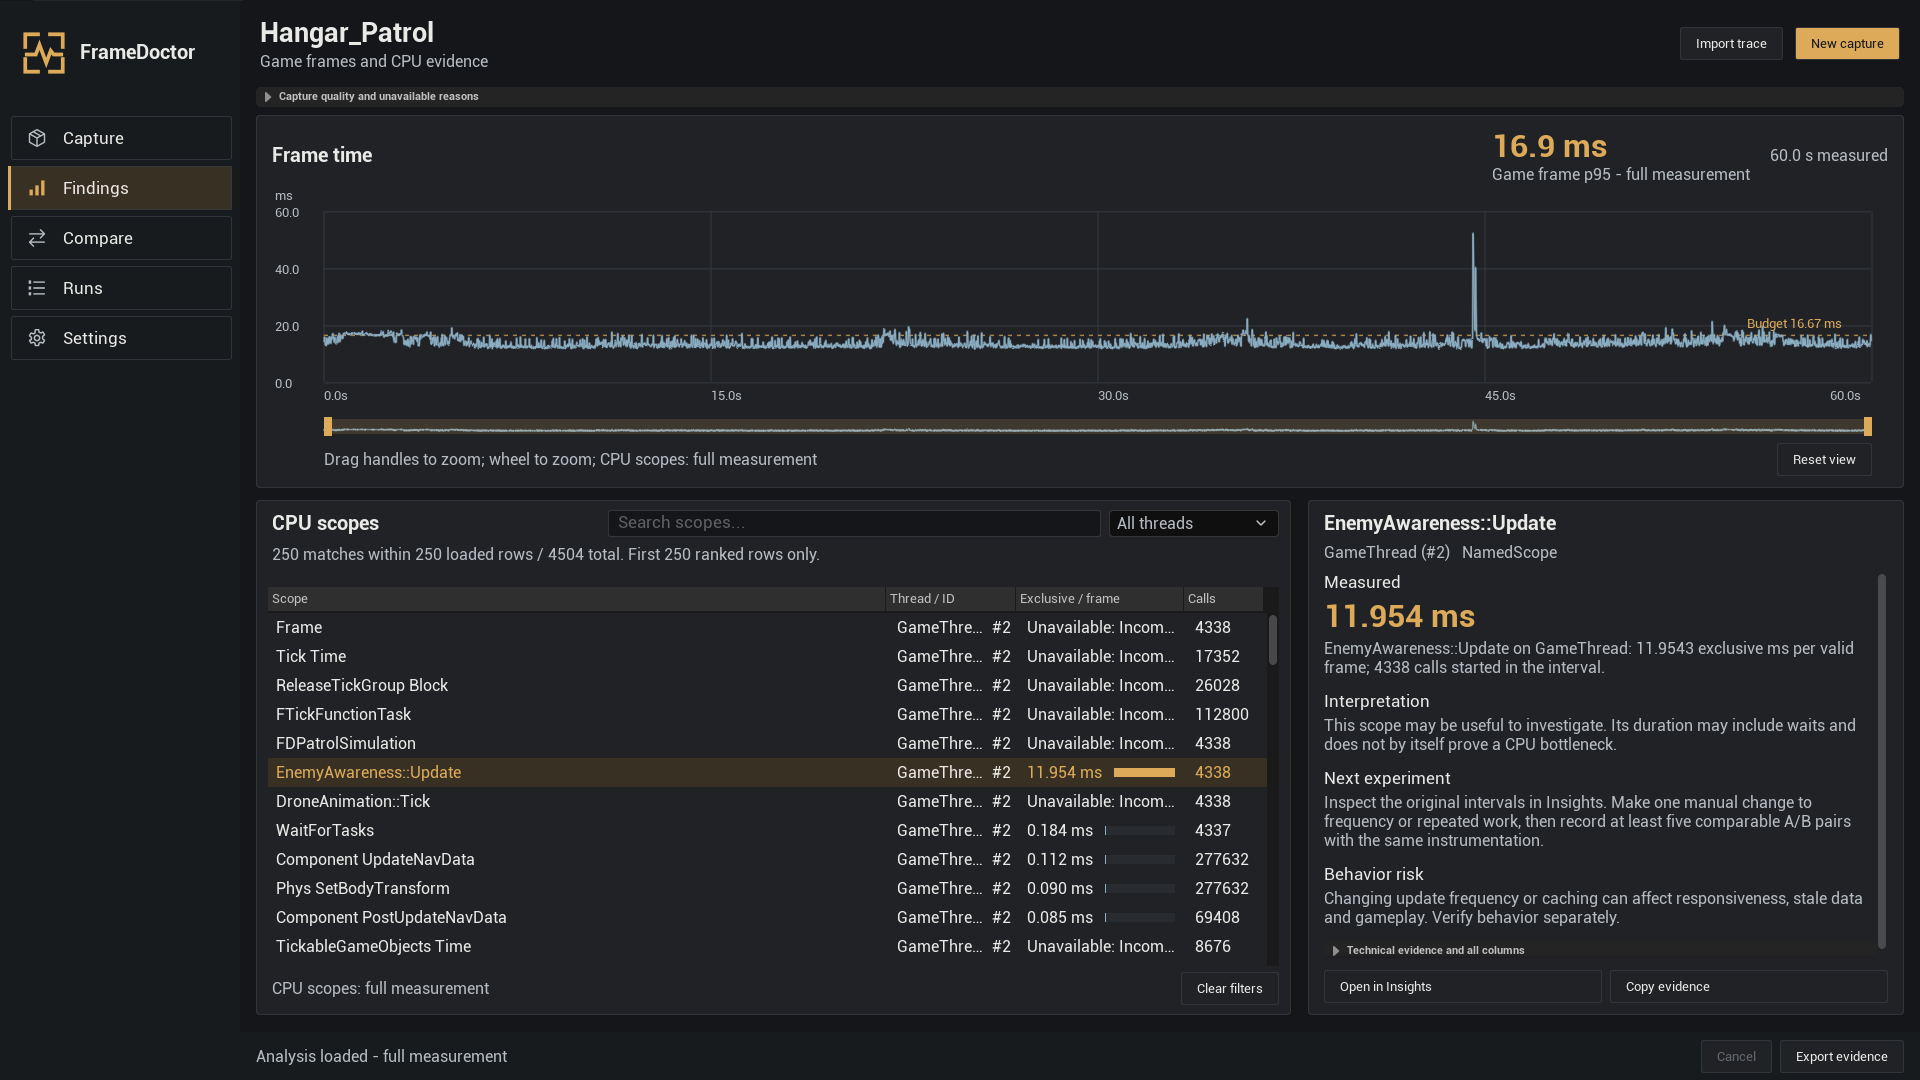
Start with capture status and quality. Open Capture quality and unavailable reasons if data is incomplete or a value says Unavailable. That means the value could not be established; it does not mean zero.
- Read Game frame p95 and the measured duration. Compare the curve with the frame budget.
- Use Search scopes… to find a timer name, or All threads to select a thread. A thread is a stream of work on the CPU; GameThread usually runs game logic.
- Click a scope row. Its panel explains Measured, Interpretation, Next experiment and Behavior risk.
- Use Copy evidence to copy the selected timer/thread/interval identity. Use Open in Insights to open the same trace in Unreal Insights and navigate to that interval manually.
Exclusive / frame is the scope's duration after subtracting its child scopes on the same thread, averaged over valid frames. Calls counts calls started in the measurement interval. A scope can include waiting. Its name alone does not identify a particular asset or prove the cost of one Blueprint node.
Do not add nested inclusive times or parallel-thread times to estimate frame cost. Game frames, render frames and GPU queue context have different meanings. If an authoritative GPU frame value is absent, it remains unavailable.
Explore the frame-time chart
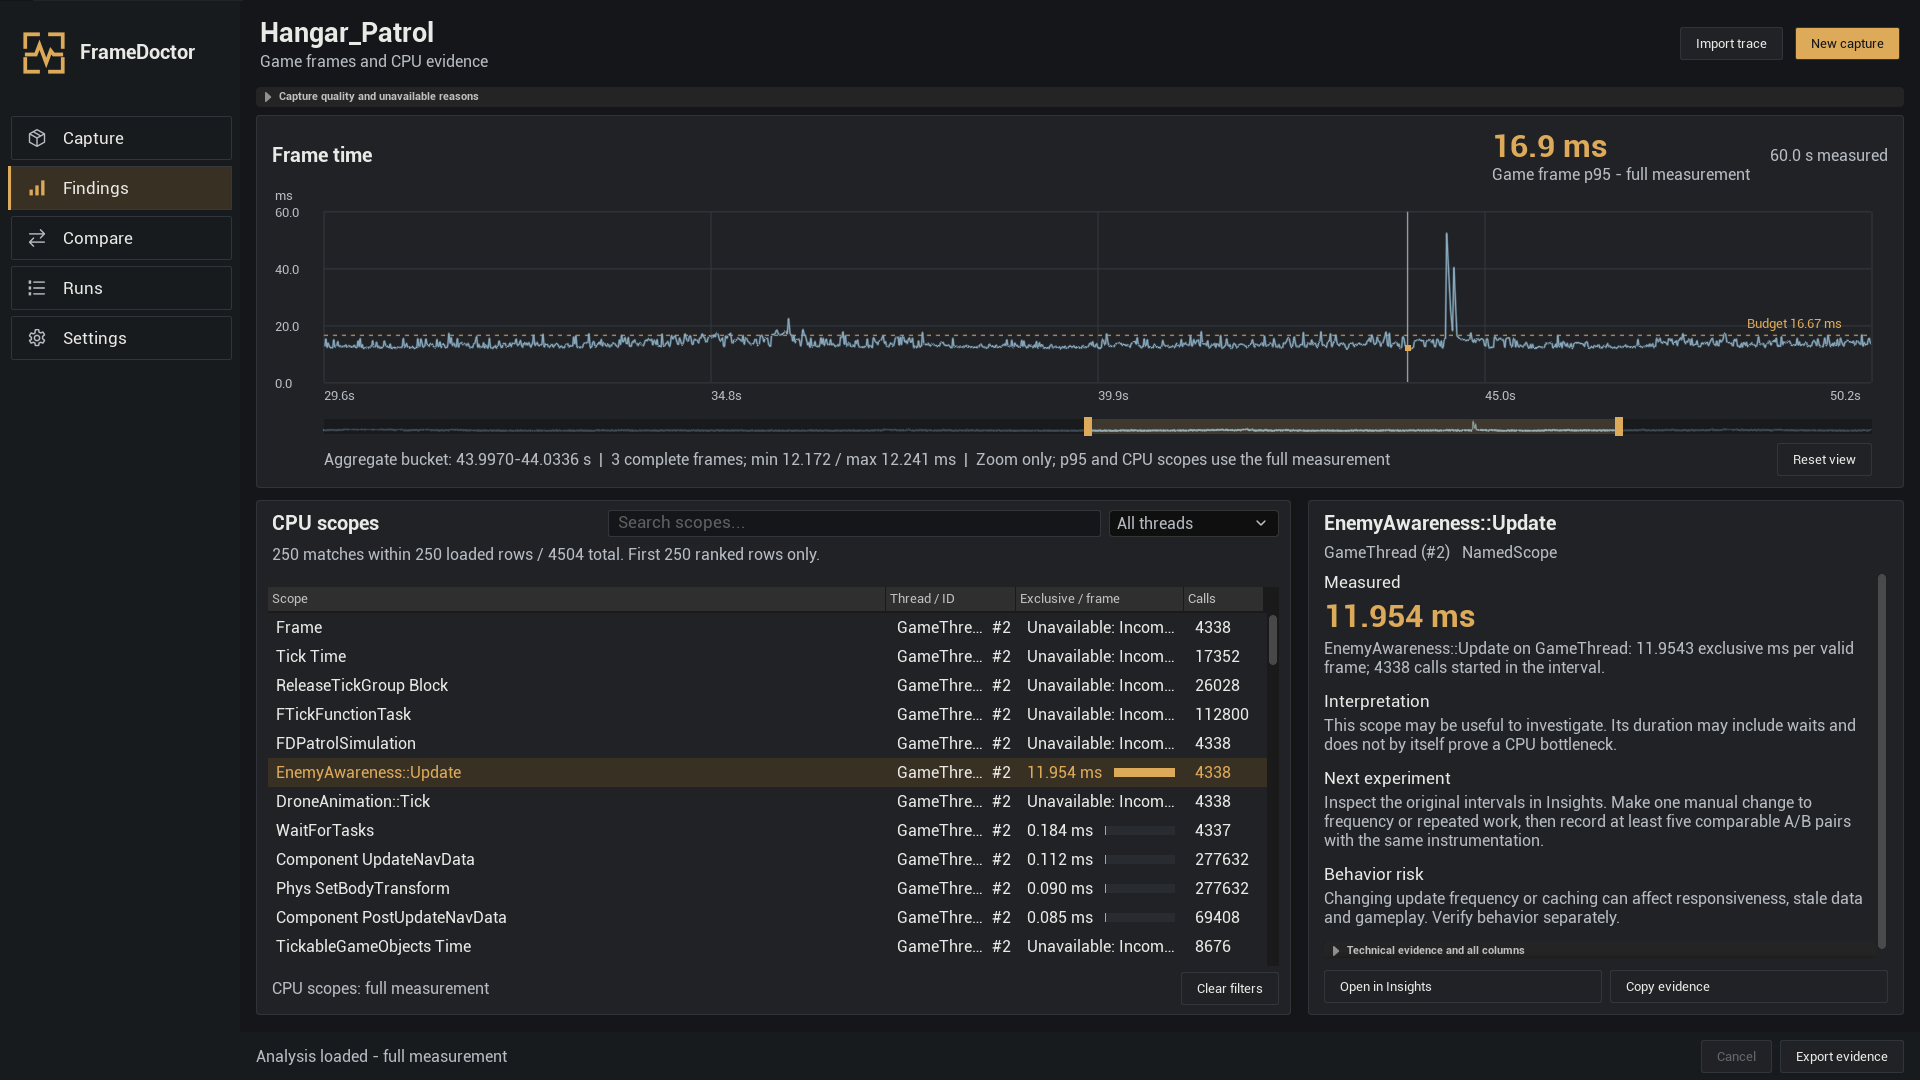
The horizontal axis is time through the measurement; the vertical axis is frame duration in milliseconds. Taller peaks are slower frames. The dashed budget line is your chosen target: 16.67 ms is approximately 60 frames per second.
- Zoom: use the mouse wheel over the plot or drag the amber handles in the small overview below it.
- Pan: drag inside the selected overview range. When the chart has keyboard focus, Left and Right shift the visible range.
- Inspect: move the pointer over the plot. The readout shows the time or aggregate bucket, sample count and available minimum/maximum duration.
- Reset: click Reset view. Home or Esc also resets the focused chart.
At wide zoom levels several frames may share a drawing bucket. Read the bucket's sample count and range rather than treating it as one frame. Gaps remain gaps when frame data is missing.
Prepare two Development builds
A Development build is a packaged game you can run outside the editor with development features enabled. Baseline A is your original build. Candidate B contains one intended change. Keep each complete build in a separate folder.
- Save your map and comparison-ready scenario. Enable FrameDoctor in the project.
- Open Edit → Project Settings → Packaging. Include your map in List of maps to include in a packaged build. Ensure the scenario Blueprint is cooked too: keep a hard reference from included content, or add its folder to Additional Asset Directories to Cook.
- In the editor's Platforms → Windows packaging controls choose Development as the build configuration, then package the project. Menus may be grouped differently by engine version. Store this complete output as build A.
- Make one manual change you want to test. Save and package build B into a different directory. Keep the scene, input, camera, NPCs and capture settings consistent.
- In Capture, check Use a packaged Development build. Browse to A's executable, then select the map and enter the scenario's generated-class path.
Map: /Game/Maps/TestMap
Scenario: /Game/Scenarios/BP_TestScenario.BP_TestScenario_C
Executable: BuildA/Windows/YourProject/Binaries/Win64/YourProject.exe
Use your own asset names. /Game is the project's Content folder as seen by Unreal; it is not a Windows drive. The generated Blueprint class ends with _C. Keep the whole packaged folder, including its content; copying only the executable is not enough.
Preflight checks the requested setup. Actual loading proves whether the foreign build contains that map and scenario. Capture is for development configurations; Shipping and Test builds cannot record FrameDoctor captures.
Epic's guide: package an Unreal project.
Check whether your change helped
- Prepare A and B as above. In Compare, expand New Development comparison.
- Choose the Baseline Development executable and Candidate Development executable. Describe exactly what you changed under Intended change.
- Choose the Primary metric before launching:
p95GameFramefor slower frames,meanGameFramefor average frame duration, orp99GameFramefor the slower tail. - Start with 5 pairs, 10-second warmup and 60-second measurement. Keep only
gameBuildIdas the normal allowed difference for your intended build change. Match resolution, graphics settings, VSync, frame cap, scenario and instrumentation. - Click Launch paired Development series. FrameDoctor runs the preserved builds in alternating AB/BA order. Keep both build folders unchanged until the series finishes.
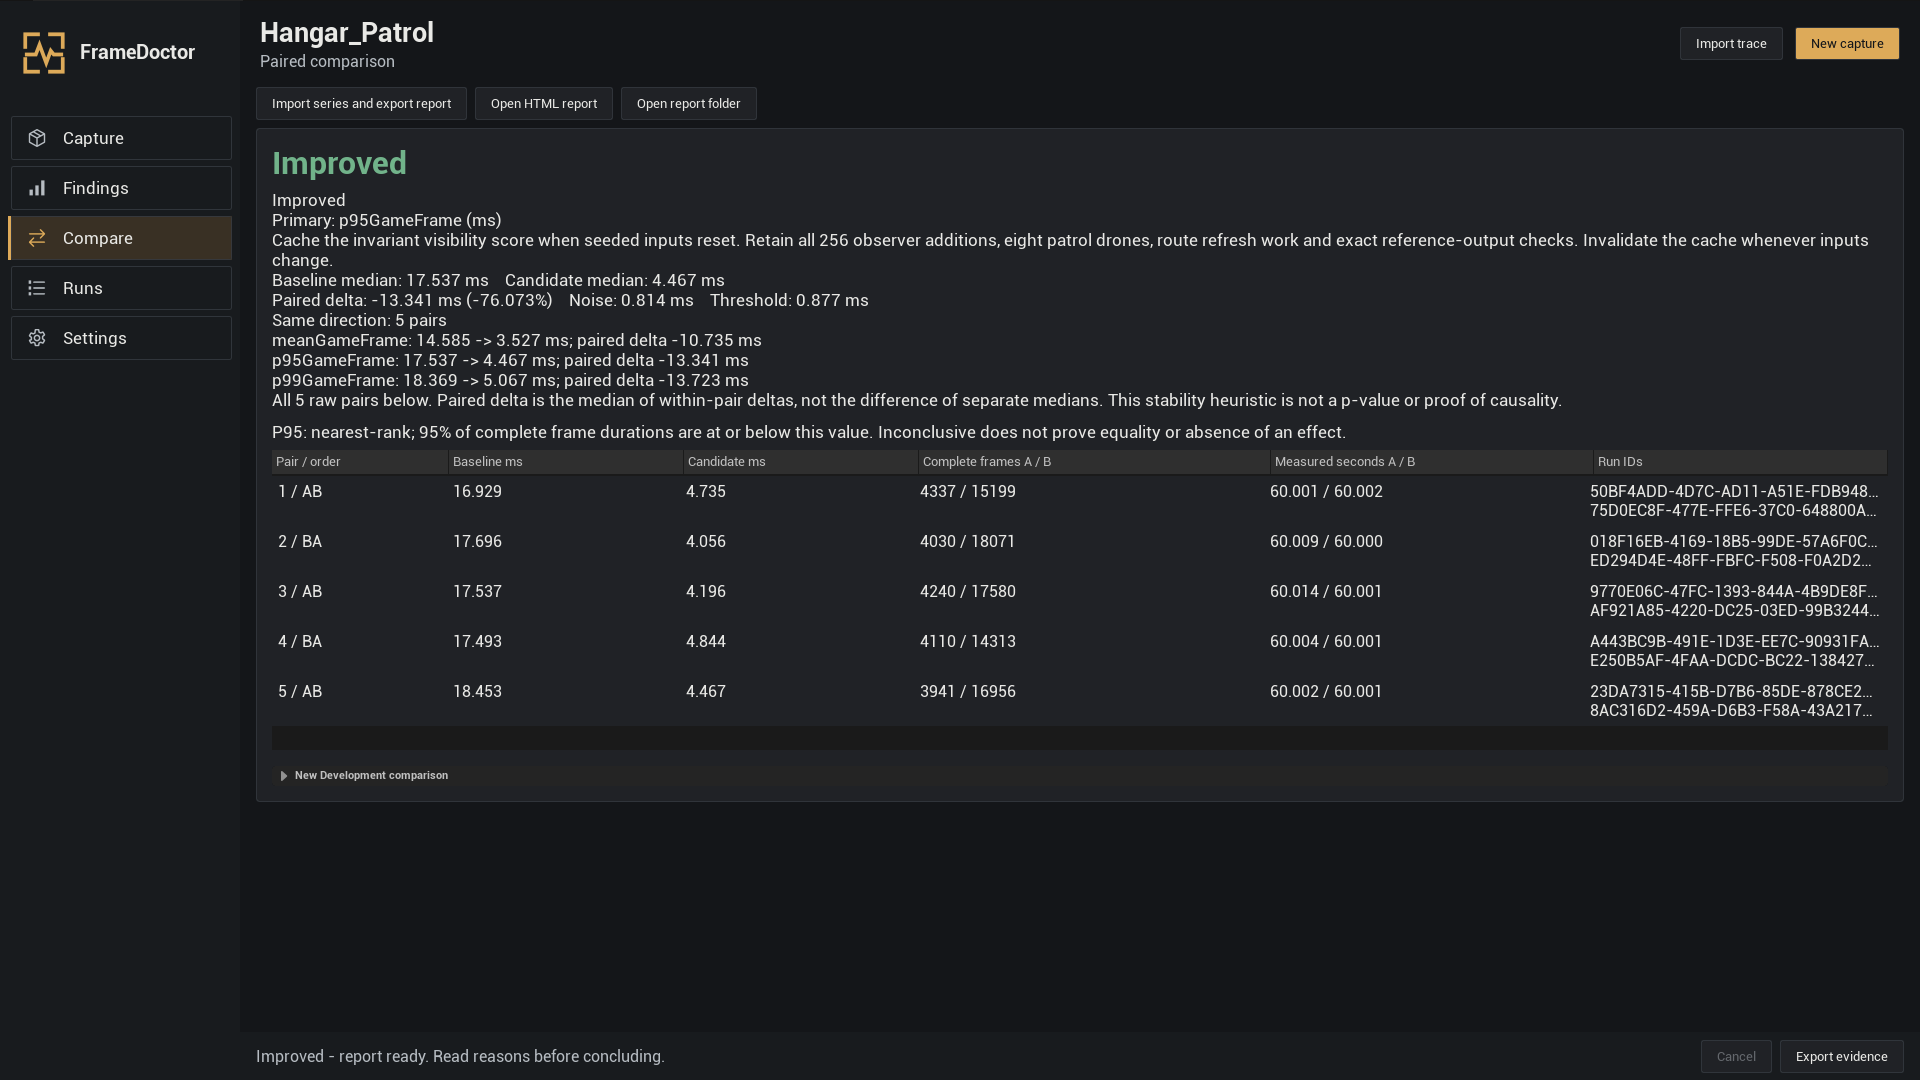
- Read the verdict and its reasons, the paired delta, noise, threshold and every raw pair. Use Open HTML report or Open report folder for the saved result.
| Verdict | Next step |
|---|---|
| Improved | The chosen frame-time metric consistently decreased beyond the confirmation threshold. Check gameplay correctness separately. |
| Regressed | The chosen metric consistently increased beyond the threshold. Investigate or undo the change. |
| Inconclusive | The effect is too small, inconsistent or lacks enough valid data. This does not establish equality or no effect. |
| InvalidComparison | The runs cannot support a valid comparison. Read the mismatch or missing-data reasons and correct them first. |
Confirmation needs at least 5 complete pairs, 30 measured seconds and 300 complete valid frames in every run, plus comparable conditions. Shorter captures can help exploration. The example exploratory scenario cannot confirm an effect.
Lower milliseconds are better. The paired delta is the median of each pair's B − A difference. It may differ from subtracting the two displayed medians. The effect must exceed the largest of the absolute threshold, relative threshold and estimated noise, with at least 80% of pairs agreeing in direction. Defaults are 0.5 ms and 5%. These checks help judge stability; they do not establish the cause by themselves.
To revisit a finished series, use Import series and export report and select its series.json. Allowed differences cannot override mismatched instrumentation or calculation methods.
Reopen and share your evidence
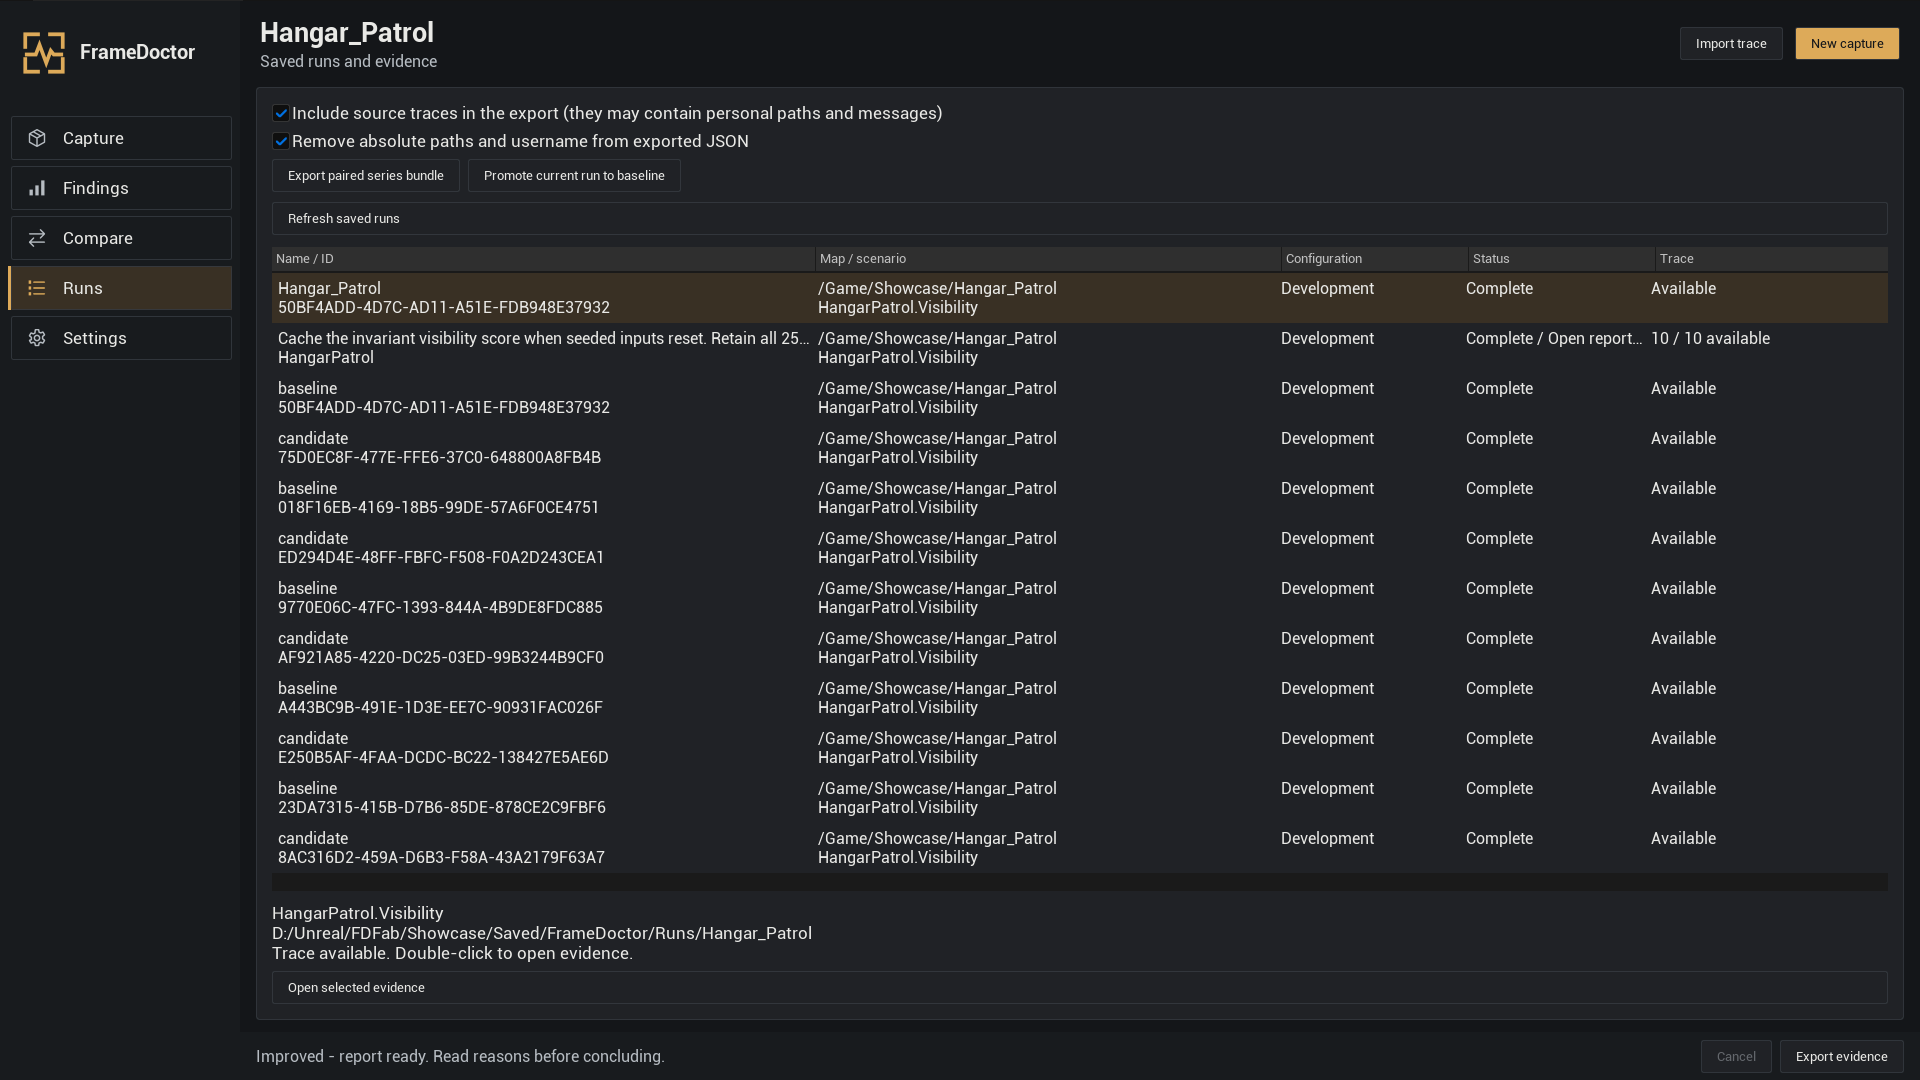
Open Runs and click Refresh saved runs. Select a row to read its source details. Double-click a run, or click Open selected evidence, to reopen Findings. A series opens its paired report.
The default output is <YourProject>/Saved/FrameDoctor; Settings can choose another output folder. A single run retains its source .utrace, manifest and analysis. A series retains series.json, comparison.json, an HTML report and references to the original runs.
- Load the series you want to share.
- Choose whether to Include source traces in the export. Leave Remove absolute paths and username from exported JSON enabled when appropriate.
- Click Export paired series bundle, choose an export location and wait for completion.
- Review the exported files, then send the complete bundle to the person reviewing the result.
Promote current run to baseline saves a qualifying complete, comparable run under <YourProject>/FrameDoctor/Baselines. A short or exploratory capture is not eligible. Keep original data until you no longer need to inspect or reconfirm it.
Save the settings you reuse
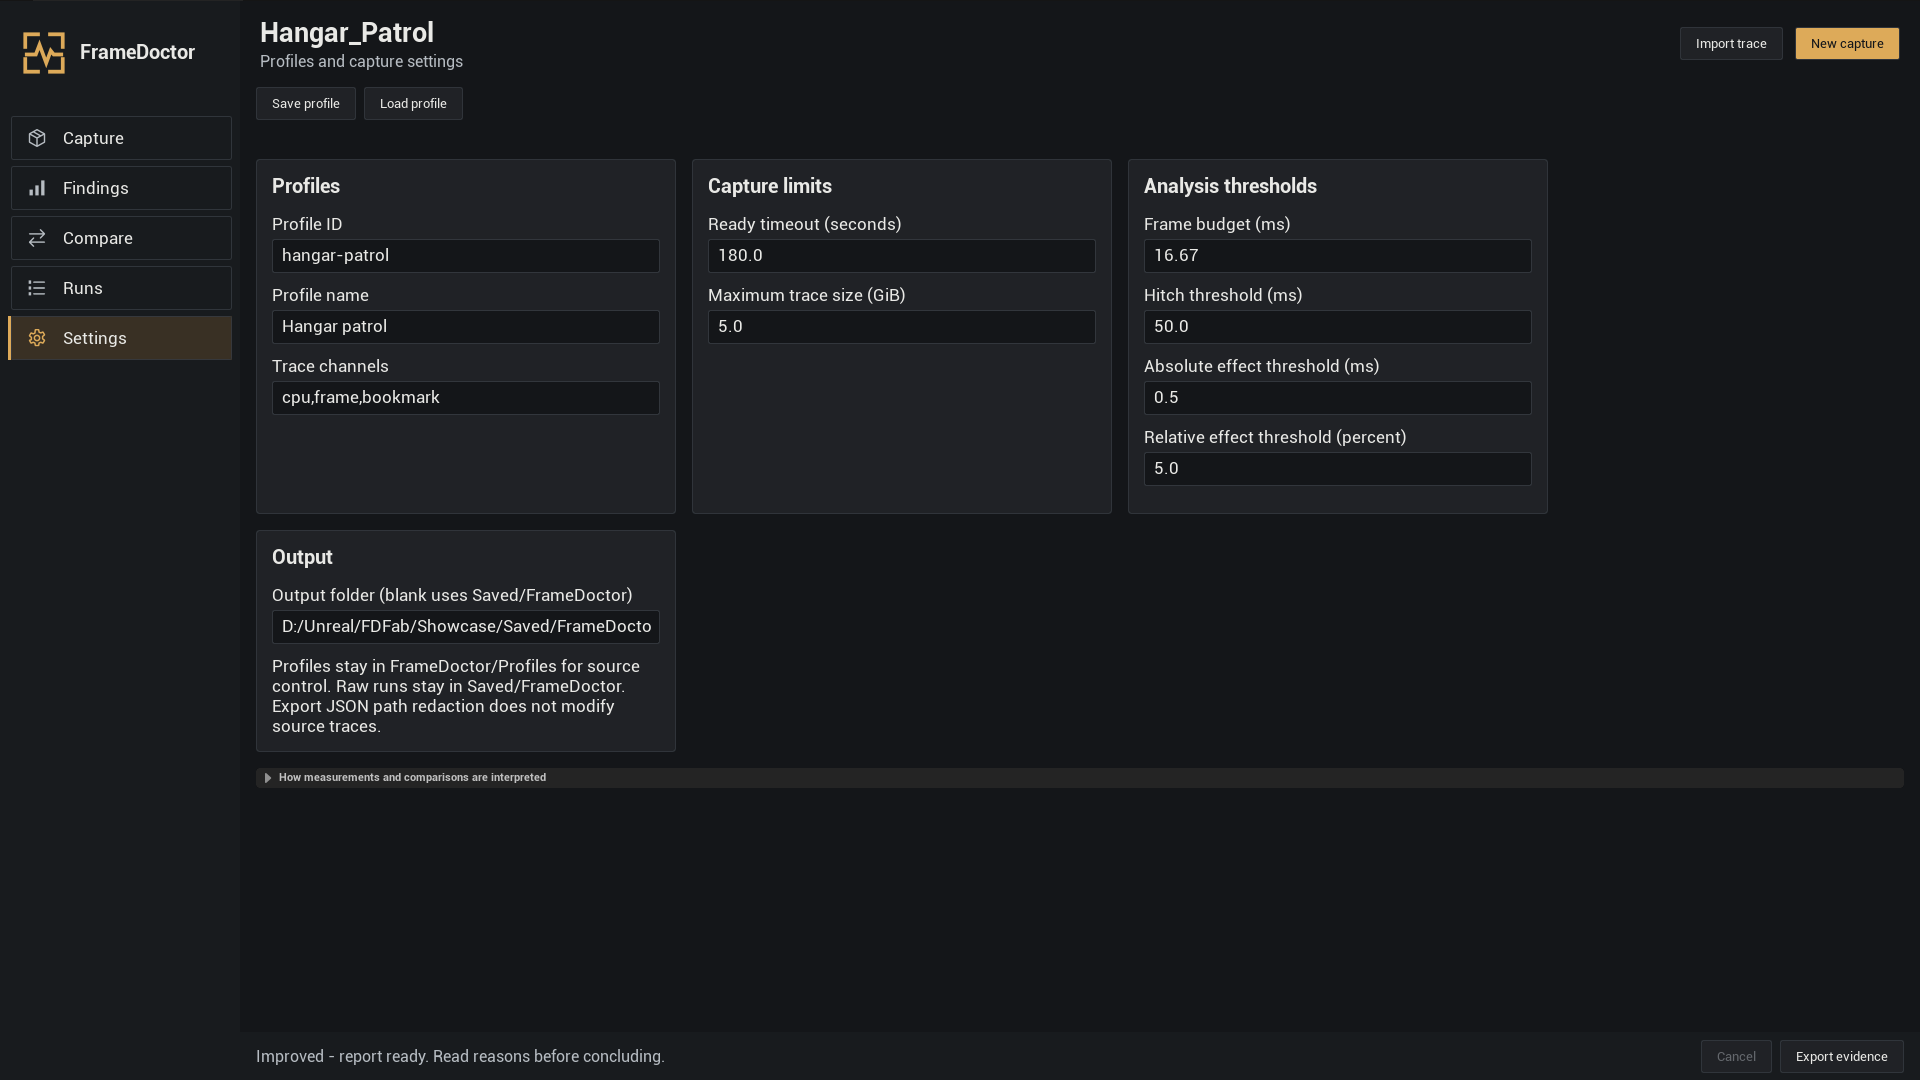
A profile is a saved set of capture and analysis settings. In Settings, choose a Profile ID and name, configure the fields, then use Save profile. Use Load profile to reopen a profile JSON file. Keep profiles in your project's FrameDoctor/Profiles folder when you want to track them with project history.
| Setting | Meaning |
|---|---|
| Trace channels | Use cpu,frame,bookmark for normal CPU/frame recordings. |
| Ready timeout | How long to wait for the scenario to become ready, before warmup starts. |
| Maximum trace size | Disk budget for one trace. A run that exceeds it fails and keeps partial data. |
| Frame budget | Your target frame duration; default 16.67 ms. |
| Hitch threshold | Threshold for counting long frames; default 50 ms. |
| Absolute / relative effect threshold | The minimum comparison effect before considering the noise check; defaults 0.5 ms and 5%. |
| Output folder | Where new recordings and reports are stored. Blank uses the default Saved/FrameDoctor location. |
Use the same profile on both A/B sides. Change thresholds to reflect your goal before starting the experiment. Editing the form while a job is running does not rewrite that job's captured settings. A profile from a newer unsupported schema opens read-only; use a compatible plugin rather than changing its schema number manually.
Make a repeatable scenario
Use this when you are ready to confirm a before/after change. A scenario needs to establish and describe the actual camera, input, NPC and random conditions. Blueprints can implement its hooks; C++ is optional for scenario authoring.
To use the separate example in an existing project, open the example project, right-click BP_ExploratoryScenario in the Content Browser and choose Asset Actions → Migrate. Select your own project's Content folder as the destination and enable FrameDoctor there. Alternatively, create your own scenario with the steps below.
- In the Content Browser, choose Add → Blueprint Class → All Classes. Search for FrameDoctorScenario and create
BP_TestScenarioin your project's content. - Open that Blueprint. In its Overrides menu implement the hooks below. This is an object selected by capture, not an Actor to place in the level.
- Compile and save the Blueprint and map. Select the class in FrameDoctor. For packaged captures, include the map and scenario in the cook as explained in Prepare A and B.
- Run one short exploratory recording to check readiness and cleanup before starting a long comparison.
| Hook | What your Blueprint does |
|---|---|
| Prepare(World) | Find the actual scene actors, save settings you will change, set the camera/input/NPC state and initialize any used random stream. |
| IsReady | Return true only after required actors, assets and initial state are ready. The default returns false. A fixed delay alone does not establish readiness. |
| BeginMeasurement | Start the controlled action after warmup. |
| EndMeasurement | Stop that action when measurement ends, including cancellation after it began. |
| Cleanup | Restore only your scenario's changes. Handle partial preparation and cancellation. |
| DescribeScenario | Return a Frame Doctor Scenario Snapshot describing the conditions below. |
Fill the scenario snapshot
In DescribeScenario, connect Make Frame Doctor Scenario Snapshot to the return value. Fill these fields truthfully:
- ScenarioId / Revision: stable nonempty identity and revision.
- CameraRoute: the actual fixed viewpoint or reproducible path.
- InputConditions: the input used, or how player input is kept out.
- NpcConditions: the population and behavior, including explicitly having no NPCs.
- ParametersJson: optional valid JSON object, for example
{"route":"fixed","npcCount":0}only when that describes the scene. - SeedPolicy / RandomSeed: Known only when you actually initialize the game's randomness with that seed; NotUsed when no randomness is used; Unknown when it is not established.
- DeclaredNondeterminism: remaining variation such as physics, streaming or operating-system scheduling.
Writing a seed number does not initialize the game for you. Unknown conditions stay exploratory. The BP_ExploratoryScenario available in the separate example project deliberately returns an empty description.
Do not remove another system's actors or recording during Cleanup. Check gameplay behavior separately after a performance change; equal timing conditions do not establish that your new logic is correct.
When something does not work
FrameDoctor is missing from Tools
Check Edit → Plugins, enable FrameDoctor and restart. Confirm the package matches your engine and that FrameDoctor.uplugin is directly inside its plugin folder. If using source, finish the Development Editor build first.
Capture running PIE is unavailable
Start the scene with Play. Leave the packaged-build checkbox unchecked, choose a concrete scenario class and wait for another job to finish. Release the PIE mouse with Shift+F1 to use the tab.
The example scenario is not visible
The optional example is a separate download; the plugin package contains no Blueprint examples. Open the example project with FrameDoctor installed and enabled, then search for BP_ExploratoryScenario under Content → FrameDoctorExample → Scenarios and select its class in Capture. In your own project, first migrate the asset. It is not a level Actor.
Ready timeout
The scenario did not become ready in time. Check your IsReady override, actual actors/assets, map and cooked class path. The base class returns false. Increase Ready timeout for legitimate loading time; keep the readiness check meaningful.
Frame time or exclusive cost is Unavailable
Frame timings need frame events and complete frames inside the measurement interval. Exclusive CPU cost also needs a complete, consistent scope hierarchy. Record cpu,frame,bookmark, keep the run alive, and read the retained reason. Never treat an unavailable value as zero.
The comparison is Inconclusive or InvalidComparison
Read its reasons. Check every run's status, five complete pairs, 30 measured seconds and 300 complete frames per run, a fully described scenario, stable conditions and matching instrumentation. Inconclusive is not proof of no effect; fix validity problems before interpreting a delta.
A packaged build cannot find the map or scenario
Package a Development build with FrameDoctor enabled. Include both the map and scenario in the cook. Use /Game/... asset paths and the Blueprint class suffix _C. Select the executable from the preserved full build folder.
Capture fails, stops or exceeds its disk limit
Read the saved run's status and reason. Check disk space, write permissions, trace size limit and whether another recorder is active. Reduce event detail or duration for a new capture. Keep Play alive and avoid changing maps or graphics settings during measurement.
Open in Insights cannot open the trace
Install the Unreal Insights tool for your engine. Keep the source trace available. FrameDoctor opens the same source; exact timer/thread/interval navigation is manual. If an engine cannot open a non-ASCII path, use a simple ASCII working location while preserving the original recording.
A report opens but its source trace is missing
The exported report may be viewable without traces, but reconfirming needs the original valid raw data. Export a new bundle with source traces or restore the complete original run folders. Redacting JSON does not create missing traces.
A short glossary
- Project / map
- Your game workspace / one level or scene stored in it.
- Blueprint
- An Unreal asset for visual scripting. You connect nodes instead of writing C++.
- PIE
- Play In Editor: the game running inside Unreal Editor.
- Development / Shipping
- A build for development / a final distribution configuration. Use Development for packaged captures.
- Trace / .utrace
- The original file of recorded timing events.
- Scope / timer / thread
- A measured span of work / its name / the CPU work stream where it ran.
- ms / FPS
- Milliseconds per frame / frames per second. At 16.67 ms per frame, the game produces about 60 frames per second.
- Mean / p95 / p99
- Average frame duration / a duration at or below which 95% / 99% of complete frames fall. A higher percentile emphasizes slower frames.
- Warmup / measurement
- Settling time excluded from the result / the interval used to calculate it.
- Baseline / candidate / pair
- The original build / a build with your change / one run of each used together.
- Noise / threshold
- Variation between repetitions / the minimum stable effect needed for confirmation.
- Cook
- Unreal's preparation of assets so they can run in a packaged game.
- Manifest / profile
- A recording's saved conditions and status / the settings chosen for a recording.
Version and support
FrameDoctor 1.0.0 · Unreal Engine 5.5, 5.6, 5.7 and 5.8 · Windows 64-bit.
When asking for help, include your engine and plugin versions, whether you used PIE or Development, the action you clicked, the saved status/reason and what you expected. Attach a screenshot or a reviewed evidence bundle when it helps. Avoid sharing personal paths or raw logs you have not checked.
For an error or unclear instruction in this guide, open a documentation issue. For plugin support, use the support contact on the FrameDoctor product page or your purchase channel.